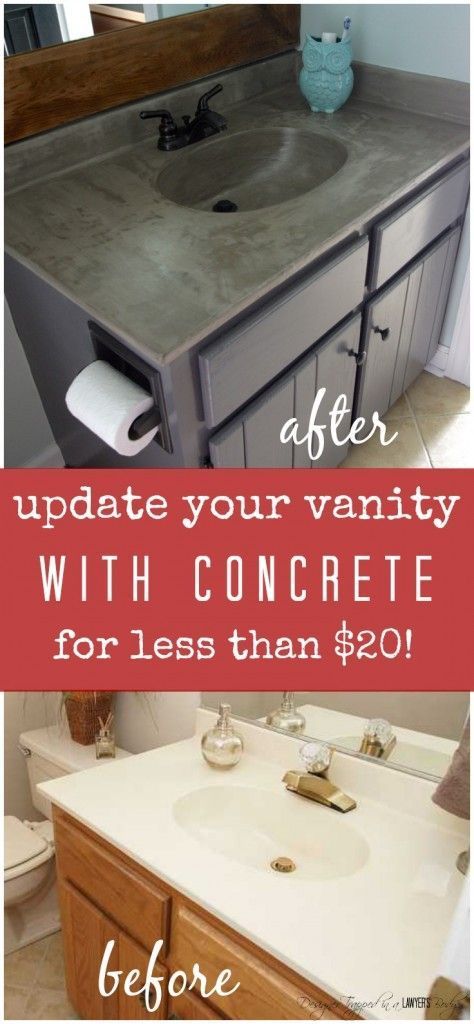
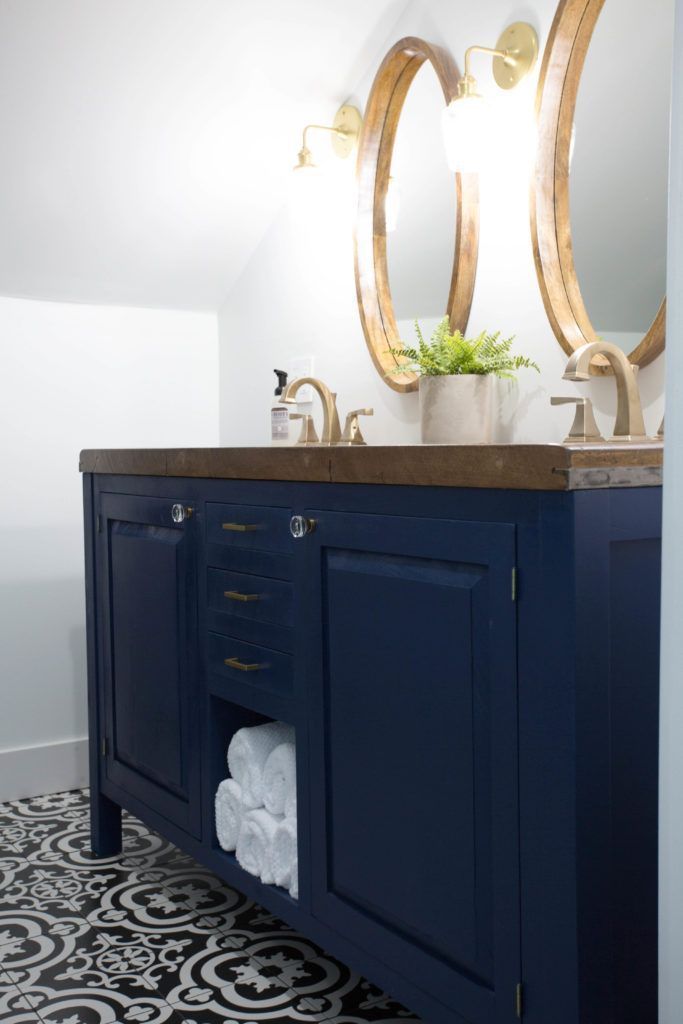
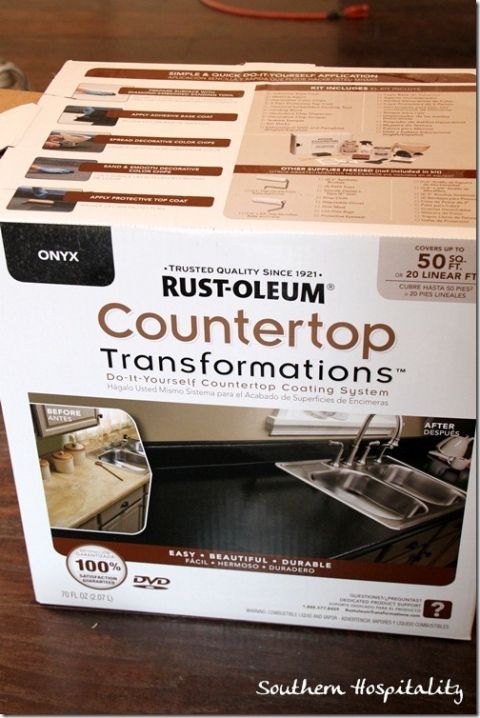
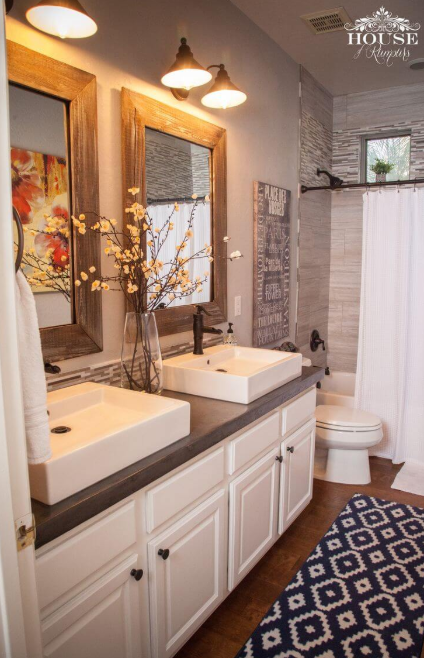
22 diy bathroom countertop ideas
DIY WOOD COUNTERTOP

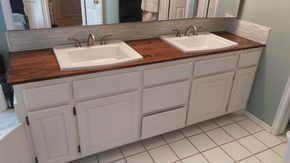
diy wood countertops + diy vanity In case you missed it, I recently gave our upstairs hall bathroom a major renovation. I made my own wood countertop for the vanity (which I also made myself… tutorial coming), and I love how it turned out! The countertop ended up being one of my hardest decisions for this reno! I considered going with a white quartz or marble countertop hoping to find a remnant for a discounted price, but I’d still have to pay someone to install it so the price was creeping higher than I wanted. I then considered doing a wood countertop because we have friends who installed wood countertops in their kitchen themselves for a low price and it looks great! I realized that regardless of the price advantage, the wood countertop actually fits the boho modern casual style of the room better than the marble or quartz does anyway. My only hesitancy was whether the wood counter would be durable enough to withstand repeated exposure to water and all the products that tend to get used in a bathroom, especially because this is the bathroom my children use and they are not the best at cleaning up after themselves 🙂 . So I ended up doing some research to figure out the best way to make a wood countertop as durable as possible. I came up with three things I could do to help make sure it was able to withstand the conditions of a bathroom: I chose to make my countertop from hardwood instead of a softwood like your standard pine is. Hardwoods are more durable and less porous than softwoods. I made sure the joints between each plank were nice and smooth and tight with no cracks for water to seep into. I sealed the countertop with three coats of Waterlox Original Tung Oil. Based on all of my research, this seemed to be the sealer that gives the most durable finish. I actually ended up spending a lot of time researching EVERYTHING about wood countertops—from lumber options, to construction, to how to install them. If you’re considering using wood countertops in your home, here are some tips and instructions based on what I learned from my research and my experience making my own wood countertop. Hopefully it can give you some insight and save you some time! 01. The species of wood you choose for your countertop is important because it will affect both the durability and the overall final look of the counter. As I mentioned, wood species are generally divided into two categories: softwoods and hardwoods. Softwoods include spruce and your common pine, and as the name suggest they are usually softer and more porous, making them easier to nick or absorb water. Hardwoods include wood like oak and walnut, and they are generally more durable and denser, making them harder to cut or drill through. I highly suggest going with a hardwood for your wood countertops. It will not only give you a more durable countertop, but it’ll also offer a wider range of choices in color and grain to get the exact look you’re going for. Your local big box home improvement store is not going to offer many choices of wood species so you’ll likely need to go to a lumber store. I considered using walnut for my countertop because I’m a big fan of the look of the wood in general, but it was more money than I wanted to spend. I ended up going with ash instead. It’s a wood commonly used to make furniture, it’s very durable, and has a really nice grain to it. Plus it was about half the price of walnut! I went to a local lumber store where I could look at all of the pieces they had in stock and choose the exact boards I wanted (some boards had a much prettier grain than others). one of the boards of ash I chose 02. The thickness of the wood will have an impact on the look of the countertop. Standard dimensional lumber like a 1×6 board are only 3/4” thick. Visually, that is a pretty thin looking countertop, it may feel proportionally off compared to your vanity/cabinets. A 2×6 is 1.5” thick which gives a much sturdier look, but might actually end up being too heavy looking depending on the style of your vanity/cabinets. Those are generally the only thickness options available at your local big box stores. A lumber store is going to offer you a lot more choices when it comes to the thickness of the wood. The thickness of hardwoods is officially measured in “quarters”. Your common thicknesses are 4/4, 5/4, 6/4 and 8/4. So a 4/4 piece of wood is around 1” thick, a 5/4 is around 1 1/4” thick, and so on. It was nice to be able to see all of the different thicknesses of wood to get a clear visual of how each one looks. I decided the 5/4 was the right thickness for my countertop, not too thin or thick. Don’t forget to choose the thickness that will look best with your vanity/cabinets! 03. After choosing your wood, it’s time to cut your boards to size which brings us to another lumber term you may not be aware of. You’ll often see lumber stores refer to their boards with a S2S, S3S or S4S designation. This refers to how many sides of the board have been pre-surfaced to be smooth and straight. A S2S board has been planed on both the top and the bottom and the two edges have been left rough. So you will need to cut both edges straight and parallel (this is how my boards came). A S3S board has been planed on both the top and the bottom and one edge has been ripped straight, so you’ll need to cut the last edge to be parallel with the precut edge. A S4S board on the other hand, has been pre-surfaced on all four sides and should be straight and ready to use. So if your boards are anything but S4S lumber, you will need to make some cuts to them first in order to get them ready to use. Once you’ve got your wood ready to cut to fit your counter, it’s best not to cut your wood planks exactly to size to begin with. Instead make each one a little larger than you will need. Then connect each of the planks, sand everything, and then do a final trim of all the edges to cut it exactly to size. This is the best way to get a clean finished look that will perfectly fit your vanity or cabinets. As far as connecting the planks, you can either use the biscuit method or pocket hole method. Since I don’t own a biscuit joiner kit, I used the pocket hole method like I used with my dining table. Simply drill pocket holes (I used a Kreg jig for this) along one side of the back of each plank (except for the last plank) and connect with wood glue and screws. Make sure you have large clamps to hold each plank tightly together, and let it dry overnight. 04. Sanding is important! Once the planks are connected, sand both the top and the bottom with an electric sander so everything feels perfectly smooth. Finish with a very fine sand paper to get the smoothest finish possible. The bottom of the countertop needs to be sanded so it will sit level on the vanity. Once you’re done sanding, verify that the whole countertop is level on both the top and the bottom. Now it’s time to trim all four edges of the counter to the exact dimensions you want using a table saw. 05. Once you have the countertop trimmed to size, it’s time to stain and seal it. I highly recommend testing your stain options on a scrap piece of your wood and choosing the one you like best before applying it to your countertop. I only tested stains I already had on hand and ended up choosing Provincial by Minwax. You can also skip the stain and just go straight to sealing if you want, as some sealers enhance the grain of the wood on their own. The top sample in my photo above is what my wood looked like with just the sealer applied, but I felt it looked too light. Whether to stain or just go straight to sealing all depends on the look you’re going for. Like I said, I used Waterlox Original Tung Oil as my sealer. My only frustration with the product was the application tends to take a lot of time. After staining my countertop I had to let the stain dry for 72 hours before applying my first coat of Waterlox. Then I had to wait 24 hours minimum between coats, with a total of three coats. I also suggest sealing the bottom of the countertop as well as the inside of all holes you cut into the countertop for plumbing. Again, three coats of that with 24 hours between each coat. It took weeks to get this thing fully sealed! But the final result was beautiful: If you’re going to use Waterlox, also note that the ideal temperature to apply it is 70 degrees. With it being winter here, the weather was too cold for me to apply it outside so I had to bring everything inside. Apparently if you apply it in cold temperatures, it will take much longer to dry between each coat. 06. Now it’s time to install the countertop! I had to do some research again in order to figure out how to attach a wood countertop to a vanity or cabinets. The general answer is you should have wood braces along the top of your vanity/cabinets and then screw up through those into the bottom of your countertop. I had gussets in the corners of my vanity and had planned to just screw through those. That would hold the countertop down in each corner. However, I noticed an area along the front of my countertop was bowing up a little which meant I needed to install a brace in that area to help pull down the countertop over there. So I decided to replace both front gussets with some 1×3 braces I made from scrap pieces of wood. Now I’d be able to get the countertop completely flush with the vanity. An important thing to remember when installing a wood countertop is that the wood can expand and contract over time with changes in the air. This can ultimately put cracks in your countertop. To prevent that you want to make the holes in the braces of your vanity/cabinets larger than the screw size, giving it room to move as it expands and contracts. A 1/2” hole seemed to be the most commonly recommended, so I drilled some 1/2” holes in the back gussets and the front braces of my vanity. Use fender washers and wood screws to connect the vanity/cabinets to the bottom of the countertop, and make sure you don’t install the screws as tightly as they can go. You want to tighten each screw just enough to pull the countertop to the vanity/cabinets. Set a long level on top of the countertop to make sure it is level. I’d also suggest attaching your faucet(s) to the countertop before installing it. Connecting up the faucets is much easier this way. And here’s the final look: I am really happy with how it turned out. Even though this countertop took awhile to complete, it was worth it! The grain of the wood is so beautiful and really helps complete the look of the room. It cost me around $100 for the wood and $35 for the Waterlox. All the other supplies we had on hand. As far as durability, so far so good, but only time will tell. If anyone else has any other tips for DIY wood countertops, please let us all know in the comments!